Shooting
Q
How do I take a test shot?
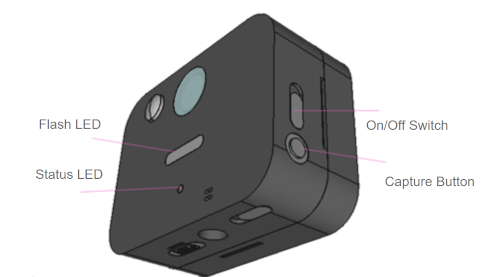
With the power ON, press the shooting button. The flash LED lights up and a photo is taken. While data is being sent after shooting, the green LED blinks; when it turns off, sending is complete.
Q
How do I change the shooting interval?
You can change it from “Camera Configuration” on the web management screen (select from 1h / 2h / 4h / 8h / 12h / 24h).
Note: Settings are applied to the camera at the next shooting and sending.
Note: You can also shift the schedule by specifying a shooting start time. (Example: with a 4h interval and a 3:00 start, photos are taken at 3:00, 7:00, 11:00, …)
For setup instructions, see Setting the shooting interval and Set the shooting start time (for project administrators).
Q
How do I shoot with the motion (PIR) sensor, and what should I be careful about?
Turn ON “PIR Sensor Detection” on the web management screen to enable it. (This is applied at the next shooting/sending.)
Note that the sensor may be triggered frequently in the following environments:
Locations with a lot of foot traffic
Locations where sunlight or shadows change rapidly
Locations with heat sources such as machinery
Note: You can also use “PIR Sensor Cooldown” (default 30 minutes) to suppress continuous triggering, and “PIR Sensor Start Time / Stop Time” to specify the active hours.
For setup instructions, see Setting up PIR sensor detection, Set the PIR sensor cooldown time (seconds), Set the PIR sensor activation time, and Setting the PIR sensor stop time (for project administrators).
Q
What is the detection range of the motion (PIR) sensor?
The motion (PIR) sensor detects human-sized objects at approximately 5 m, and small animals such as rats at approximately 1 m. The detection angle (FOV) is approximately 90° both horizontally and vertically.
Q
How long does it take from detection by the motion (PIR) sensor to shooting?
A photo is taken approximately 2 seconds after the motion (PIR) sensor is triggered.
Q
The images are dark. What should I do?
You can adjust “Flash Brightness” in “Camera Configuration” on the web management screen. Adjust it to the optimal brightness while taking test shots. Note that the brighter the flash, the faster the batteries drain.
For setup instructions, see Setting the flash brightness (for project administrators).
Q
Can the flash LED be turned off completely?
Yes. Set “Flash Brightness” to “0%” on the web management screen and the flash will no longer light up.
For setup instructions, see Setting the flash brightness (for project administrators).
Q
The captured images are blurry.
Check the following two points and take a test shot again.
Whether the protective film is still on the lens
Whether there is dirt or water droplets on the lens (wipe it with a soft cloth)
